
Dental Exposure & Bonding Chicago IL
Exposing & Bonding Impacted Teeth In The Near North Side Of Chicago
Our oral surgery team specializes in exposure and bonding procedures designed to address impacted teeth—particularly canines and other teeth that haven’t erupted properly into the dental arch. This precise surgical intervention works in harmony with orthodontic treatment to guide impacted teeth into their proper position, restoring both function and aesthetics to your smile. Our board-certified oral surgeons combine advanced techniques with gentle care to ensure optimal outcomes for patients of all ages.
Impacted teeth occur when teeth fail to emerge through the gums naturally, often remaining trapped beneath bone or gum tissue. Left untreated, these impactions can lead to serious complications including infection, damage to adjacent teeth, cyst formation, and compromised oral health. Our exposure and bonding procedure creates a pathway for these hidden teeth to be carefully guided into proper alignment, preserving your natural dentition and supporting long-term dental health.
Key Benefits of Exposure & Bonding
- Preservation of Natural Teeth – Rather than extracting impacted teeth, exposure and bonding allows us to save your natural dentition. This conserves bone structure and maintains proper spacing, providing superior long-term oral health compared to artificial tooth replacements.
- Improved Facial Aesthetics – Properly positioned canines and other teeth contribute significantly to facial symmetry and an attractive smile profile. Our procedure helps achieve ideal dental alignment, enhancing overall facial balance and appearance without the need for prosthetics.
- Enhanced Oral Function – Correctly positioned teeth enable proper biting, chewing, and speaking functions. Patients experience improved ability to eat a varied diet comfortably and speak clearly after successful alignment of previously impacted teeth.
- Prevention of Complications – Addressing impacted teeth through exposure and bonding prevents potential serious issues including dental crowding, misalignment of adjacent teeth, root resorption, cyst development, and infection—issues that often require more extensive treatment if left unaddressed.
- Coordinated Care Approach – We work closely with your orthodontist in a coordinated treatment plan. This collaboration ensures seamless integration between the surgical exposure and the orthodontic movement, optimizing both treatment efficiency and outcomes.
- Minimal Visible Scarring – We employ techniques that minimize disturbance to surrounding tissues. Using precise incisions and careful tissue management, we ensure minimal visible evidence of the procedure once healing is complete.
- Long-lasting Results – Unlike temporary solutions, properly executed exposure and bonding procedures offer permanent correction of the impaction issue when combined with appropriate orthodontic follow-up, providing lifelong benefits to dental health and function.
Dental Exposure & Bonding Overview
What to Expect During an Exposure & Bonding Consultation
During your initial consultation, Dr. Swan will conduct a comprehensive evaluation of your dental condition, focusing specifically on the impacted tooth and surrounding structures. We’ll review your dental history and any previous or current orthodontic treatment, and examine detailed imaging including panoramic x-rays and possibly 3D cone beam scans to precisely locate the impacted tooth and determine its position relative to adjacent teeth and anatomical structures. This detailed assessment allows us to develop a customized surgical approach tailored to your specific situation.
We’ll explain the entire exposure and bonding process in clear, understandable terms, discussing how we’ll work in coordination with your orthodontist to achieve optimal results. Our team will outline all aspects of the procedure including anesthesia options, expected recovery timeline, and post-operative care instructions. We encourage questions during this consultation, as we believe informed patients experience better outcomes and less anxiety. Before you leave, we’ll provide a detailed treatment plan including cost estimates and scheduling options that align with your orthodontic treatment timeline.
We believe in informed decision-making, so we’ll thoroughly review all treatment options, including procedural details, anesthesia choices, and expected outcomes. Our team will address any questions you may have about the procedure, recovery, and financial considerations. We’ll also coordinate with other healthcare providers if needed, such as speech therapists or lactation consultants, to ensure comprehensive care before and after your frenectomy.
How is Exposure & Bonding Performed?
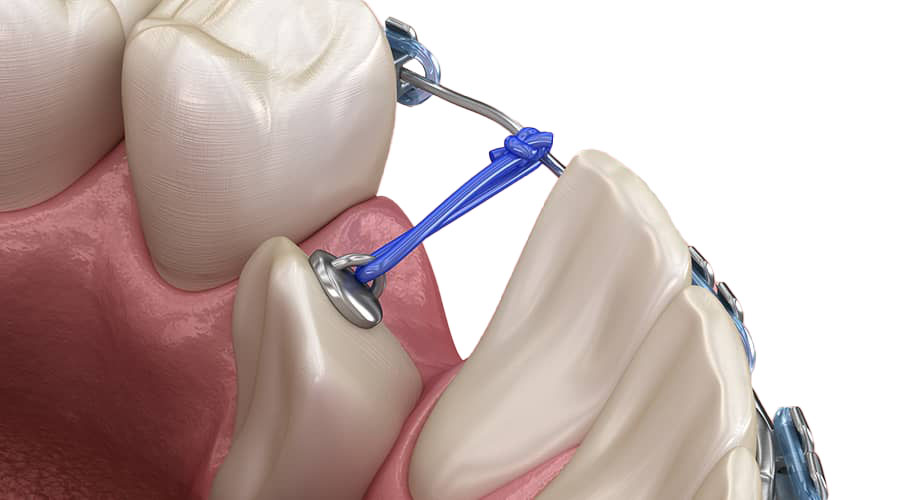
On the day of your procedure, our team will ensure your comfort through appropriate anesthesia—typically local anesthesia combined with sedation options based on your preferences and needs. The surgical procedure begins with a carefully planned incision in the gum tissue covering the impacted tooth. Our surgeon will precisely remove the overlying gum tissue and, if necessary, a small amount of bone to expose the crown of the impacted tooth. This exposure creates the access needed for orthodontic treatment while preserving as much healthy tissue as possible.
Once the tooth is exposed, we’ll bond a small orthodontic bracket with an attached gold chain or wire to the exposed tooth surface. This attachment serves as the anchor point your orthodontist will use to gradually guide the tooth into proper position within the dental arch. The surgical site is then sutured with the chain extending through the gum tissue to be connected to your existing orthodontic appliances. The entire procedure typically takes 30-60 minutes to complete, depending on the location and complexity of the impaction. Before you leave our office, we’ll provide detailed instructions for immediate post-operative care and schedule your follow-up appointment.
How is the Recovery After Exposure & Bonding?

Recovery from an exposure and bonding procedure is generally straightforward, with most patients experiencing mild to moderate discomfort for the first 24-48 hours. This discomfort can typically be managed effectively with prescribed or over-the-counter pain medications as recommended by your surgeon. Some swelling and minor bleeding are normal immediately after surgery. Applying ice packs to the outside of your face near the surgical area for 20 minutes on, 20 minutes off during the first day helps minimize swelling and discomfort.
During the first week of recovery, you’ll need to follow a soft food diet, avoiding hard, crunchy, or spicy foods that could irritate the surgical site. Proper oral hygiene remains essential, though you’ll need to clean the surgical area gently using the specific techniques we’ll demonstrate before you leave our office. A prescription antimicrobial rinse may be provided to help prevent infection while promoting healing. Most patients can return to school or work within 2-3 days, though strenuous physical activity should be avoided for about a week.
Your initial healing will be complete within 7-10 days, at which point your orthodontist will begin the process of gradually moving the exposed tooth into position. This orthodontic phase typically takes several months, during which you’ll have regular appointments with your orthodontist to adjust the tension on the chain attached to the exposed tooth. Throughout this process, our oral surgery team remains available for any questions or concerns, and we’ll schedule periodic follow-up appointments to monitor your healing and the progress of the tooth movement.
The full benefits of the exposure and bonding procedure become apparent as the previously impacted tooth moves into its proper position in your dental arch. This coordinated approach between surgical exposure and orthodontic treatment typically yields excellent long-term results, with the formerly impacted tooth functioning normally and contributing to a balanced, healthy smile. Most patients find that any temporary discomfort during recovery is well worth the lasting benefits of preserved natural dentition and improved oral function.
